Monday, May 31, 2010

Blah to Beautiful Votive Covers

I imagine that I'm not the only person who has developed quite a stash of these over the years. Clear votive holders and a variety of tea light candles are common party favors at weddings, showers and everything in between, so I have plenty of non-matching sets sitting around. I do love the twinkling that a few votives can add to a setting, but as far as presentation, they can be a bit of a dud.

IMG_2615.JPG

So I made myself a few of these.

IMG_2595.JPG

I originally set out to make all of my votive covers like the blue one pictured above. But once I got working, my plan just kept evolving and I thought of different and "better" ways to do it as I went. I thought I'd share the basics of how I made these 4, and you can copy the method for the cover that you like best, or come up with an even better version.

IMG_2547.JPG

To start off, I blew up a balloon so that it was slightly bigger than my votive holder, and this would be the base of the votive cover. Since the balloon was a bit lopsided, I used the top of the votive holder as a guide, and made circles around the top and bottom of the balloon with a sharpie. This gave me a guide as to where exactly to wrap the strings, and also ensured that my votive cover had a flat base. I made the bottom circle (the base of the cover) a little smaller since that is where the votive would be sitting, and made the other end (the top of the cover) relatively wide, so that the heat from the candle could escape easily without setting anything on fire. A necessary precaution, I think.

IMG_2555.JPG

I then turned to my Mod Podge, using a few different methods to get these results I was hoping for.


1.)
Paper Painting.

IMG_2604.JPG

For this first votive holder, the white one, I used white crepe paper and white cotton twine. I started off by cutting several strips of crepe paper about 5 inches long, and in half lengthwise.

IMG_2567.JPG

I used the Mod Podge as glue to stick the end of the crepe paper to the balloon. I stretched out the paper until it was pulled relatively taut, and then gently painted the Mod Podge over top of the strip, smoothing it down as I went. I had tried dipping the strips, but this kind of paper is so delicate that it kept tearing before I could even get it onto the balloon. Painting on the Mod Podge worked much better, and I covered the balloon strip by strip.

IMG_2562.JPG

When the crepe paper was dry, it seemed too delicate and like it needed a bit more texture, so I added some cotton twine using method #2.


2.) Twine Dipping
.

IMG_2609.JPG

For this votive cover I wanted a bit of color, so I first soaked some white cotton twine from my stash in watered down blue fabric paint. I let it sit for an hour, wrung it out, and let it dry. I then cut the twine into long strips (about 4 feet long each), dipped into some Mod Podge that I had in a bowl, and started carefully wrapping it around the balloon, wringing it out as I went. I wrapped 2-3 long strips around the balloon, let those dry completely, and then went back and did a few more strips just to try to cover as many of the gaps as possible. This cover took me 4 different sessions of wrapping 3 strips of twine at a time. (Don't worry, it dries out pretty quickly in this hot Illinois heat!)


3.) Twine Painting
.

IMG_2605.JPG

For this votive cover, the brown one, I wrapped the ballon tightly with one long strand of jute twine, tucked the end under, and then painted the Mod Podge onto the threads. It was so easy!

IMG_2593.JPG


4.) Paper Dipping
.


IMG_2602.JPG

For this one, the newspaper cover, I simply shredded newspaper into 3 inch strips, dipped it into the Mod Podge, and wrapped the strips around the balloon a little at a time. I liked this method because it was easy to cover any little cracks with tiny pieces of newspaper, and kept the translucent look that I would have sacrificed if I layered the paper on too heavily. It was a bit more time consuming, but much easier to work with than the crepe paper.

So which one was my favorite? The grand prize winner goes to...

IMG_2581.JPG

The newspaper cover!! I'm a sucker for book page crafts, so this one might have had my heart from the beginning! The newspaper is durable enough that I don't feel like it is about to rip, but is thin enough that the light still shines through with a bit of a funky glow.

Which one do you like? I'm sure you have some great ideas on how to improve on this project, and I'd love to hear them! I still have many more clear votive holders floating around the house...

Also, I feel a bit obligated to say, if you do make one of these, please make sure that the top of the cover is wide and higher than the flame. They are made out of paper and string, so, as with all fire items, please do not leave your candles unattended, even if they are outfitted in beautiful new covers!

I hope you like these and they can help banish a few of the boring votive holders in your home. Please check out the link parties hosted by these amazing ladies here, and I'll see you next Monday. Happy Memorial Day!!


Visit thecsiproject.com

E1025F317CFB5B8E9E5C526E5CC0F475.png

Read more...

Friday, May 28, 2010

Alligator Birthday Party

For Will's 2nd birthday, we chose alligators. We liked the idea of using an animal with an identifiable color, plus they're just really cute! After looking back at some of the pictures, I realize I didn't have as many of the details as I thought. Luckily, I had some of my favorite parts, though!

One of my favorite parts about Will's birthday were the cupcakes. A friend from church made both his cake and cupcakes. How adorable are these alligator heads made from graham cracker dippers?! What a fabulous idea she had! We had lots of green-colored foods like green apples, green punch, lemon-lime soda, kiwi, honeydew, green jello, green applesauce, and green grapes. You could also serve GATOR-ade as another perfect drink.

We used various shades of green and blue throughout his theme. Another friend found these adorable alligator placemats. We displayed alligator books and puzzles on Will's new IKEA table. We also displayed one of his presents that came in an alligator box from Hallmark. You could definitely add an inflatable alligator or alligator slip-n-slides to go for more of a water theme. Another idea I wish I had thought of for his party would be to fill clear cylinder vases with green water as a centerpiece-very swamp like!

I made the invitations using "swamp" wording.

At the party, we played pin the tooth on the gator and bean bag toss using homemade green and blue beanbags. You could also use green socks to make alligator puppets. You could play a game using the green socks placed all over the floor acting as alligators that the kids need to avoid stepping on to reach the island (using a brown ball or Frisbee) in the middle. Will's green favor bags held a tot-sized stuffed alligator found at Target's dollar bin, a homemade alligator cookie, and I'm sure other fun treats that I can't seem to remember (or have pictures to help me remember! ha!). You could add a book like "The Lady with the Alligator Purse".

I'll be linking to some of these great parties this week. Be sure to check them out to see their amazing creations! Enjoy your Memorial Day weekend!

Read more...

Thursday, May 27, 2010

Spoon Flowers

A few months ago, I saw the most amazing kitchen wreath I have ever laid my eyes on over at Tatertots and Jello, which showcased a great spoon flower. Of course I immediately imitated Jen's beautiful work. However, I am just now brave enough to post my version to share. Mine doesn't quite include the charming centerpiece her's did, but it works for me!


Some of the materials I used are shown below. An ugly old frame, black paint, cheap thrifted silverware. gingham ribbon (my love), hot glue and scrapbook paper were just what I needed to get started.


First, I painted the frame black and cut some scrapbook paper to fit the exterior of the frame. (When mounting the spoon flowers later, I wanted the frame to act more as a shadow box.)


I started with inexpensive silverware that I purchased a Goodwill and bent it at the neck to make the spoon heads form petals and use the stems as leaves.


I then used a dab of hot glue in various places to form the silverware into clusters, which I then glued togther with a VERY generous amount of hot glue. (To be realistic I wish that I had known about and used Gorilla Glue for this part. I have a feeling it would provide a stronger hold than hot glue.)


To make the centers, I simply used extra crystals that I stole from my dining room chandeleir (don't worry, we won't miss them!)


To attach the spoon flower to the frame, I simply wrapped a string around the heavily hotglued flower backs and ran the gingham ribbon through it.


I then just tied the spoon to the frame with the paper mounted on the back. This way, the spoon is simply hanging from the frame and not resting its weight on the paper backing. I love the idea of repurposing things this way. Thanks for the great idea Jen!


I am loving this whimsical addition to my kitchen at the moment. And, it goes great with this awesome wind chime my sister bought me a couple of years ago at a flea market.


I'll be linking to these parties this week. Stop by and take a peek! Happy Thursday Friends!

Read more...

Wednesday, May 26, 2010

What I like Wednesday: Farm Sinks

I love a good kitchen. Don't get me wrong, it's not because I cook or anything, there is just something intoxicating about a beautiful kitchen. I dream of having a big family, all gathered around in a beautiful kitchen on the holidays, enjoying a nice bottle of wine and great conversation. All while my husband is cooking away! Ha!

Anyway, as soon as I have enough expendable income to actually make my own decisions about what comes in my kitchen, this is the FIRST thing I will be hunting down: A beautiful farm sink. Enjoy some sink inspiration I have found lying around lately...

My #1 obsession...The beautiful kitchen at Home & Harmony...


#2 Beautiful blue with a farm sink at Pink Wallpaper...


#3 And finally, this gorgeous modern meets farm sink by my home ideas...


Enjoy! See you again tomorrow!

Read more...

Tuesday, May 25, 2010

number beanbags

I have seen number beanbags before, so I am not claiming to be the one to have thought of this fabulous idea, but just thought I would share a tutorial on how mine were created...

1.) Choose fabric scraps from around the house or search a fabric store for the perfect combinations of fabric for your beanbags. I have a ton of scraps so I just tried to pick one from every color in the rainbow since these were a present for my 2-year old niece.

Next make a pattern out of cardboard for your beanbags slightly bigger than the finished size you want them to be. My pattern was approximately 4 1/2 x 4 1/2. Use the pattern to cut out your squares...


2.) Use Avery iron-on transfer paper to print out the numbers as a mirror image. Cut out each number leaving a white edge all around. Iron a number on one square of each color...


3.) Put the 2 squares right sides together and sew 3 sides. Make sure to leave some room at the bottom of the beanbag to fold inside. Cut the edges with pinking shears...


4.) Turn the beanbag right side out and push the extra length inside the beanbag. Iron it down for easier sewing...


5.) Stuff each open-bottom beanbag with navy beans (or whatever bean works for you)...

{WARNING: When choosing a 4-year old helper to stuff beanbags, be aware that she just may spill the beans all over the place and cause a slight delay in the progress of the project.}


6.) Sew the ironed open end together. I sewed this side twice to be sure it was secure...


7.) Lay all of your beanbags out and stare at them for awhile...


8.) Find a cute bucket at Hobby Lobby (or anywhere that sells buckets). Make a cardboard tag with the child's name printed on it and hang it from the bucket with a scrap of fabric...


9.) Give it to your sweet niece (or whomever you love and adore) for her birthday and watch her take them in and out of the bucket 25+ times just for fun...


These beanbags make a fun and educational gift! Little ones can learn sorting, colors, numbers, and all kinds of things from them. Of course, you can also explore your options and iron-on the letters of their name, the entire alphabet, shapes, etc.

I will be joining these fun parties this week. So many amazing ideas floating around out there, you will definitely want to check out the inspiration and link up your latest project!

Happy Tuesday!

Read more...

Monday, May 24, 2010

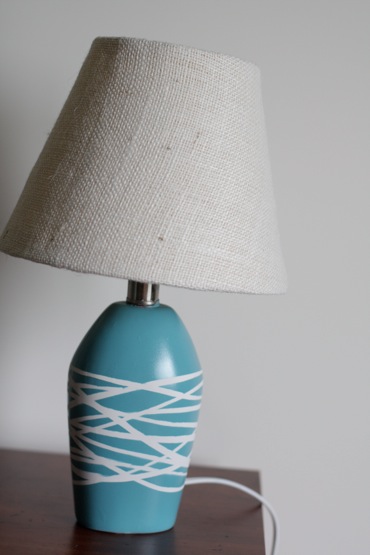
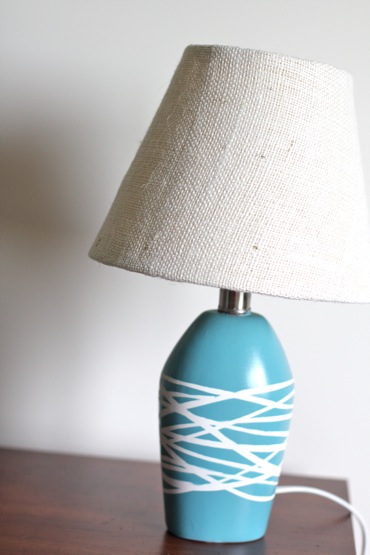
Re-vamp into a Blue Lamp


IMG_2279.jpg

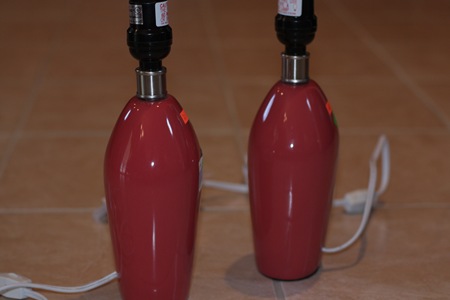
I got these lamps forever ago, as in over a year ago, and have just been sitting on them waiting for just the right idea. Sometimes inspiration comes in the most unlikely places.

2010_04_13_8224

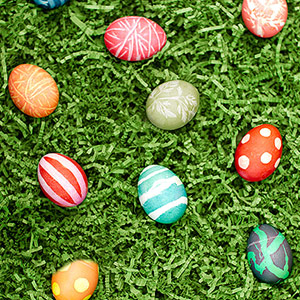
As in, Parents magazine, at Easter time. This is typically the magazine that I read to try to be a good parent, not for crafty inspiration, but sometimes you get a bit of both. For some reason, I looked at that string-wrapped-looking egg and thought not of eggs but, "I must do that to those lamps!"

ss_101534179.jpg

I will admit that my first attempt at these babies turned out to be a big fail, because in my excitement over finally having a direction to go with this project, I neglected to first dull the glossy surface of the lamps before painting them. Don't do this. A few days later you will end up with a very sad situation on your hands.

2010_04_15_8264.JPG

The second time around, I dulled the surface of the lamps with a fine sandpaper, covered the sockets and cords with plastic bags and tape, and then spray painted them with a white primer.

2010_04_14_8246.JPG

When the primer was completely dry, I got some raffia, wet it slightly and wrung it out well because I wanted it to lay completely flat against the surface of the lamp, and started wrapping. I wanted a crisscrossing kind of look, so I alternated between wrapping it just around the middle, and wrapping it around the top and then under the bottom of the lamp. When I got to the end of the raffia, I carefully tucked it under one of the first strands that was pulled tightly so that the whole thing wouldn't unravel.

2010_04_21_8370.JPG

I then pulled out my trusty Mediterranean spray paint (by Valspar), and got to work. I got down level with the lamp (meaning on the ground, but if you could elevate your lamp it will make this part easier), because I wanted to spray straight onto the raffia, as opposed to spraying from a top angle where the paint might run down underneath the raffia a bit.

I did 2 light coats, mostly because I was still nervous about the paint running. But it turns out that this was just enough.

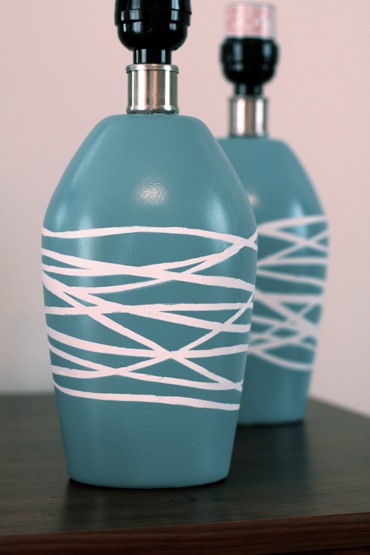
When the paint was dry, I carefully peeled off the raffia strands, and held my breath. Luckily, dulling the surface this time worked! No little maroon spots were glaring up at me, just a fun blue and white pattern.

2010_04_21_8374.JPG

I love the texture that this approach provided! I followed up with a satin polyurethane for protection.

IMG_2265.JPG

What do you think? Aren't they fun?

IMG_2243.jpg

I don't have a lampshade "before" picture, but it was a basic shade that was yellowed with age and had a few stains. I covered it with some white burlap, which more than covered the stains, still gave me the light glow that I was looking for, and added just a bit more texture to the mix.

IMG_2280.jpg

I'm pretty pleased with the results. This is my first venture into anything to do with lamps, so now going to start looking at the other lamps around my house and to see how I can change them to give that space a little boost.


Visit thecsiproject.com

Read more...
Related Posts with Thumbnails